Friday, December 18, 2015

December Update (End of 2015)

           Due to my busy schedule, I have not been able to update this for 3 months, but slowly things are coming to fruition. A huge overview of changes that have been made in the design below:

  • The Base Extension has been slightly redesigned to consume less material, increase the space for wires and decrease overall printing time
  • The MK-X frame extension mount has also been slightly redesigned to follow the base extension as well
  • The MK-X Top Frame Extension mount has also been updated
  • A new material has been chosen for insulation
  • The carriage mount is now at a 30 degree angle to allow for shorter arm lengths and increased height
  • The neoprene GT2 belt has been replaced with Steel core GT2 belts
  • A mounting plate is now in place over insulation over the Steel core belts to reduce thermal expansion in the chamber
  • The NEMA17 motors have been replaced with updated ones
  • 5mm Borosilicate glass has been replaced in lieu of 400mm diameter MIC-6 Aluminum 
  • The polyethermide aka Ultem build surface has been replaced by a FR-4 class composite material known as Printbite to serve as the new printing surface as it can adhere to nylon when heated.
  • The silicon heater pad is now AC and 400 watts instead of 300 watts and 24V to decrease the danger of high currents
  • The Smoothieboard controller has now been replaced by the Duet V.8.5. + Due X4 Expansion board
  • The 600mm Hiwin MGN12-H linear rails have been replaced by V-slot wheel carriages
  • The Misumi 2020 1m vertical extrusions have been replaced by 2020 1m V-slot extrusions
  • The Misumi 2020 485mm horizontal extrusions have been replaced by 2060 V-slot extrusions
  • The Kraken effector has been redesigned
  • A dual IR sensor for 7-factor delta auto-calibration by DC42 has also been included
  • A detachable blower fan/led ring/ and dual IR sensor design has been created
                                                                    Base Extension:


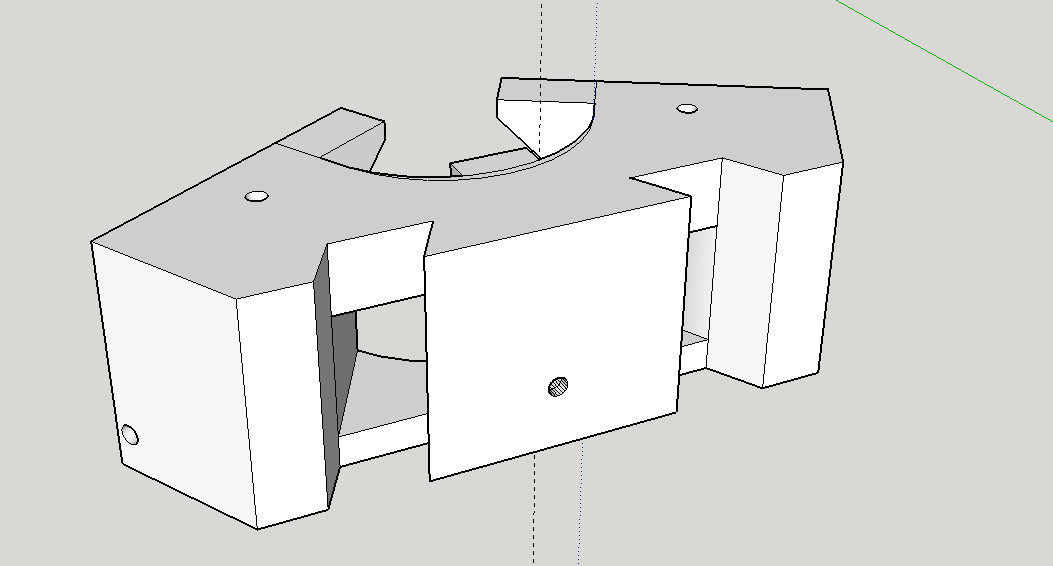
       This is the 3D model for the base extension and now has larger slots to feed larger gauge wire and sheathing comfortably without cable strain. It also contributes to lower print times and material costs. The base itself has been extended another 40mm to allow for allowance of the larger build plate.You can compare this to :

                                                              Frame Extension:
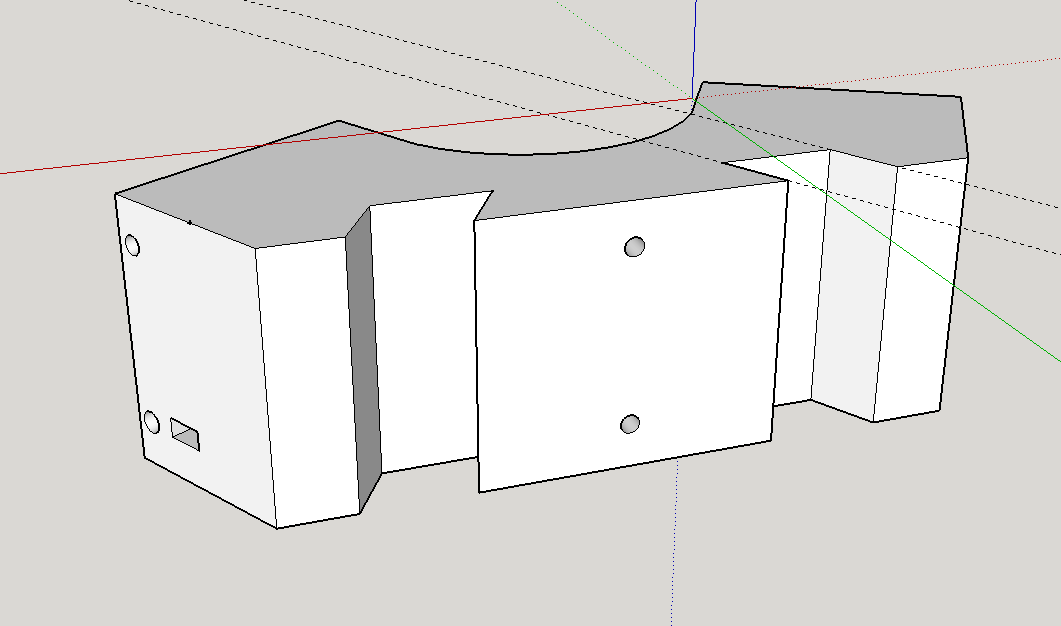
       It can be seen that the design follows the Base Extension as it is placed directly on top of it. The top extension is only slightly modified from this design and will not be discussed.


                                                                 Insulation material:
The insulation chosen now will be EPS - Expanded Polystyrene as it has decent flame retardation properties, coupled with aluminum plates as the exterior case, it will be able to insulate a majority of the heat.

                                                                  Steel core GT2 Belts
Steel core GT2 belts were chosen to replace the standard neoprene GT2 belts as they have shown to have lower stretch at elevated heated chamber temperatures. The extra stiffness of the belts will help as each tower requires at least 2.1m of belt. A mounting plate will cover the belts over the vertical carriages for both aesthetics and insulation.

                                                                 NEMA17 Replaced
The most common NEMA17 motors are 1.8 deg/step or 200 steps per rotation. To increase the resolution at lower layer heights and decrease visual artifacts and use .9 deg/step or 400 steps per rotation NEMA17 stepper motors.

                                                                  400mm Alu Build Plate - Printbite
To adjust for a much larger plate, the glass plate has been dropped for MIC-6 grade aluminum plates to be very flat. The PEI was difficult to source at that size so Printbite is going to be used instead. Printbite has shown to be able to adhere to more materials than PEI itself and thus makes it very attractive.

                                                                       Duet V.8.5 + DueX4
    The Smoothieboard controller was replaced in favor of the Duet board and its extension due to its ease of setup for 9-stepper motor control. 3 movement axis and 6 extruder channels. It also allows for quick hookup of the Dual IR sensor.

                                                                       V-Slot Extrusions
The extrusions were replaced as part of using the V-slot linear motion components. The Linear rail originally purchased at 600mm was too short for full length of travel.

                                                                        DC42 Dual IR Autocalibration Sensor
The IR sensor that DC42 allows for quick (~30sec) autocalibration before each print allowing for complete automation.
               
·

Wednesday, September 9, 2015

MK-X Beta Stage V.3

A few updates, been away designing and printing some prototypes:

This is optional base extension. It goes underneath the main frame and gives another 60mm of height so that all of your electronics can fit + storage of allen wrenches and what not. The circle is for wiring which is concealed by insulation and the mount has a hole in the center( hard to see because it's white) that you can feed the wires out of.

This is the MK-X frame extension mount, It adds 40mm on either side for insulation and just a bit of extra space for those who have plates that extend just slightly beyond the extrusions. It also has mounting holes and magnetic slots on the other side for the metal plate exterior that can be taken off quickly to access wiring.

Here they are stacked:


The accompanying top piece:
It also has an optional mount for the top frame extension for more electronics etc.

Extruder:

This is a slightly modified Airtripper for short mounting holes, you'll see why shortly. Still working on the dual hobbed , coming soon..... Derived from http://www.thingiverse.com/thing:731585


This is the Floating extruder base (slightly old design, there has been significant new design changes within the past hour). It has a top piece as well, but I didn't print it yet. It's designed so that it is oriented short side is facing you and has minimal amount of bowden bending for the kraken. I haven't installed it yet, but my rough guess, the bowden tube from the top of the heatsink to the E3DV6 bowden couplers is around 100mm. All wiring and watercooling tubes fit through the center. It is also designed to house 4 flat watercooling blocks if you see fit.

Pan and Tilt Camera

Pan and tilt camera, uses 2 micro servos and the top piece mounts to the X-brace with 1 M5 screw. Side panel for second servo not shown. Derived from http://makezine.com/projects/raspberry-eye-remote-servo-cam/

Tuesday, September 1, 2015

MK-X Beta Stage V.2

Next update: PEI bed and X-Brace mounts


Here's the X-Brace center connector. I designed it to be split in half for ease of printing and installation. It allows you to have some leeway in the installation of the extrusions, so you don't have to painstakingly get them equal the very first time as you can adjust it to fit the printer's extrusions. it takes 16 M4 10mm screws - same as the ones for the robotdigg alum corners ( Trying to minimize the # of different nuts and bolts required.) It also has 2 M5 screw holes for a tighter compression of the braces ( not necessary), but really it's more for additional screw mounts for tool holders and the pan and tilt camera. 


Also started on my PEI bed today! 

Saturday, August 29, 2015

MK-X Beta Stage V.1


Man I learned a ton of openSCAD, boy did it take long, but it's proving to be extremely useful too. Many things are turning out as I had hoped.
Here are a few updates below! 


First up, is a Cherry Pi IIIS 2nd derivative spring carriage: 
         I hate zip ties for anything other than tidying up wires for aesthetic reasons. This carriage is going to have an optional cover plate, but that's excess and will come later. I also always had trouble tightening up my belts on my Kossel and wanted a simple belt tension system where I didn't have to hold a belt extremely taut and then quickly ziptie it. This is what I'm working towards.No loops here, The belt goes through the top belt gripper, and there is a screw that travels left to right tightening the belt even further. There is almost an identical piece to the top belt gripper (not pictured), forgot it somewhere. This bottom piece has a peg that fits , snug into the slot so that it does not rotate in the XY plane (perspective looking down directly on the Z-axis from picture's pov), but can travel in the Y direction. The bottom belt also mounts in the same manner as the top. A fairly long M3 screw enters from above and goes through the bottom belt gripper into a nut insert. This way, you can easily turn the m3 screw and tighten or loosen the belt as you see fit.


Spring Effector Kraken Effector mount Alpha prototype
This one has a few kinks to work out, this is an old design, and has been edited since then. The auto-tool changer stuff is going so far back its not even on a back burner, its off in a corner cooling. Till then, Just a screw mounted hotend style. This raises the Kraken so that the block itself is flush with the bottom of the effector plate. I have V6 heater blocks which don't fit in the same manner as the V5 heater blocks so they are positioned at different angles. There are slots on either side that allow for the wiring to pass through. The effector was designed to raise the Kraken up for 2 reasons, to gain back 20mm of printing height, as well as bringing the bowden tubes higher up. I am running quad  dual-hobbed pulley extruders in a float configuration above the hotend which is pretty wide. This allows me to shorten the bowden tube as the arms widen up further up the rod allowing for clearance of the extruder setup.

MKX Crossmount
This is a 20mm tall cross mount, designed so you can stack multiple to strengthen if you want to. I only have a profile view of it, but its not flush to the extrusion. It is brought out 15mm because many people use build plates that extend past the plates and it gives me clearance so that the effector doesn't hit the cross arms. They are also M5 holes. It's designed so that it syncs up with the rest of the MK-X design, but I made it so you can just toss it onto nearly any 2020 delta for some extra strength. You just need to print 2 pieces then print 2 more but just mirrored. There is also a connector in the center of the X for extra mounting( tool change, pan and tilt cam, pick and place, etc)  Coming soon...

Sunday, August 23, 2015

Saturday, August 22, 2015

Saturday, August 15, 2015

Alpha Stage V1

Almost all the parts!
Had to put all the parts on the floor since I didn't have the table space to put all the parts on

Listing the parts:


  • 300mm 5mm thick Boro Glass
  • 24V 300W Heater
  • 3M 468 Tape for the PEI
  • PEI 12x12"
  • 3x NEMA17 for 3-axis movement
  • 10m of GT2 Belt
  • 2x NEMA17 for extruder
  • 4x 5mm Hobbed pulley
  • 6x microswitches
  • Spectra line 100 meters
  • 10m of spiral loom
  • 400x zipties
  • 3x 600mm MG12H Linear Rail
  • M3, M4, M5 T-slot nuts 100 each
  • Robotdigg Delta Extrusions
  • 2x Standard Servos for pan and tilt octoprint monitoring
  • Power Switch Tail
  • DC 25A SSR w/ Heatsink
  • Smoothieboard 5XC
  • 623ZZ Bearings
  • 608 Bearings
  • 24V-12V DC Converter
  • 8x 500mm 2020 Aluminum Extrusion
  • 9x 485mm 2020 Aluminum Extrusion
  • 3x 1000mm 2020 Aluminum Extrusion
  • 3x heatsinks for the NEMA17 axis motors
  • 120V switch
  • 12V switch
  • 2x Screw Terminals
  • Raspberry Pi
  • Raspi Cam
Still missing:
  • 18" Carbon Fiber rods
  • Metal spheres
  • Springs
  • 24V 33A PSU (792W)

Sunday, August 9, 2015

Alpha Stage V.5

A large update:

  • The hotend is now going to be an E3D Kraken V6
    • (Tim of Filastruder is gracious enough to replace the included V5 heater blocks with V6 heater blocks, making the choice very easy)
    • Having it already watercooled lessens the work on me greatly.
    • Now I have to go find a proper reservoir, or make one myself with cast acrylic
    • 4 Nozzles:
      • .25 Stainless Steel for exotic and high precision filaments, CF-PLA, Gmass, Glow in the Dark, Conductive, etc.
      • 2x .4mm brass nozzles for everyday filaments, with 1 set for PLA and the 2nd for ABS or 2 ABS colors
      • 1x .8mm for High speed Draft Printing/Infill and Support
    • 4 Extruders, dual hobbed
    • 2 MAX31855 boards for two of the extruders for better temp control and increasing the thermistors on the Smoothieboard
    • 2 K-type Thermocouples
  • Tool Changing will be on the back burner for the moment until after I get the printer up and running completely.
  • the 2.8 Watt Laser cutter is also on the back burner for the moment.
  • Upgraded 24V car heater at 235W instead of the 150W on ebay and Amazon for about $29.99
  • The wall layering will be R-tech Insulation, then a Sound Dampening Panel, then a Metal Sheet on the exterior.
  • The front door will be a Polycarbonate door with a simple manual magnetic latch.
  • The bed will now be a 300mm Boro Glass + PEI + 2mm Alum. Heat Spreader and 300W heater mat
    • I realized I don't really need 400mm bed, and if I do, I'll just upgrade it.
    • the heater will be 24V because I have a Power Switchtail II on the Pi, and it will control the 800W PSU which means I can keep my home safe in case the temperatures become wild for any reason.
  • No more rotating Turntable, since it is not plausible
  • I'll have a priming bin so that I can easily brush the small plastic pieces right into it and then have a clean printing area.

Tuesday, June 16, 2015

Update's Update!

Alright, I bit the bullet and I am going back to the 2020 Aluminum Extrusion build:

A few reasons:

  • The 2020 Aluminum extrusions, I have already purchased and would drop the overall cost of the build by over 400 dollars.
  • I found Aluminum Corner brackets for the Kossel which will be significantly stiffer than anything I could possibly print and will hold up due to high temps
  • Also, secondly, the amount of design drops significantly and I only have to design new carriages, effector and bottom additive frame brackets versus, everything needing to be designed by myself.
  • It allows me to use Linear rails which will always run straight and will add significant stiffness to my build
  • I realized I do not really need 400mm build area, and that 300-350mm is more than sufficient
  • I realized the additional work to have belts run in the channels was not worth it for just mere aesthetic gain
  • My build is large enough that the effector will not run into the belts.
Now, the secondary issue is whether or not I should use an AC bed heater or just a DC bed heater, a AC bed heater will heat up much much faster, but requires an additional plug. 

Sunday, April 26, 2015

Alpha Stage Update V.002

Completely new design as required
1000mm Tall 40x80 C-Beam extrusions by OpenBuilds so that the the carriages ride in the channel to keep the belts away from the heat as well as the wheels
·         1000mm tall 20x20 extrusions as a vertical support to the upper rails and extra space
·         500mm horizontal 20x20 black anodized extrusions
·         V-slot wheels
·         Belts are in the internal extrusions to reduce amount of stretch and wear due to heat
·         Cherry Pi IIIS derived Spherical Spectra String mounted effector for precision and no backlash (3S)
·         Hotend is undecided (E3D Chimera Volcano) or E3D V6 Volcano
o    All-metal
o    300C capable
1 E3D V6 with a .25 nozzle (dual bowden feeding system)
1 E3D Chimera Volcano with .4 nozzle and 1.2mm nozzle (Quad bowden feeding system)
·         Automated Tool Changing via electromagnetic kinematic coupling on the effector
·          cross bracing 500mm 20/20 black anodized extrusions to resist torsional loads
·         Hidden- Rotating tool holder on the X-braces to maximize build area
·         2 Watt Laser cutter/engraver
·         Multi-Syringe Extruder
·         Large Pick-n-place for mounting electronics, Auto-ejection
·         Multi-Cylindrical Tool (Pencil, Pen, X-acto Knife, Sharpie, conductive ink pen)
·         Recirculating Carbon filter and HEPA filter
·         Heated Build Chamber (at least 50C)
o    24V Ceramic Heater mounted to the upper portion to increase chamber temperature
o    R-tech insulation to reduce heat loss
o    Sound Dampening panel
o    Metal panel to increase rigidity
o    Polycarbonate Door with electromagnetic latch
·         Water cooled system
o    (6 Steppers (min.))
o    Hotend(s) watercooled
o    120mm Radiator mounted above
· Out of filament detector with automated pause and growl push notifications via octoprint
·         Built-in custom OctoPrint with Raspberry Pi 2
·         RGB lights mounted behind 40x80 V-slot extrusions for even lighting with light change depending on machine state(On, Heating, At temp, Printing, Cooling)
·         Dual Synchro Gear Float Extruders
o    # of extruders still undecided
o    Using a TB6600 Stepper controller to control a High torque NEMA23 for high speed and torque without resorting to gearing. 
o    Hobbed pulley geared 1:1 to have more contact on the 1.75mm filament
o    Extruders float above the effector via a counterweight pulley system with spring tensioned connectors to carriages to resist the momentum changes due to high speed effector OR - Have the extruder on a carriage connected to a counterweight so that it travels up and down
·         FSR AI Heuristic Calibration
·         Astroyn Dampers
·         400mm Build plate
o    16" Mic-6 8mm thick aluminum plate (tolerance .005") for build plate
o    Build plate is a .003" PEI sheet to remove the need for additional adhesive
o    24V 400 Watt Silicon Heater
o    Mounted with 3 point magnetic Kinematic Coupling with 10 micron repeatibility (Proven by MIT thesis by Raymond Ma that kinematic coupling is the absolute best way for repeatability.)
o    XT60 Connector for disconnecting buildplate
·         Soluble support mixer built-in
o    Fan+Nd magnet underneath build plate to create a stir mixer 
o    Heated bed to create heating element for the solution bath
o    PLA is used as soluble support via a NaOH solution in a 60-70C solution for about 3 hours. 
·         Dual camera monitoring via Octoprint
o    Webcam monitoring the build 
o    Webcam monitoring controlled by servos with tilt and pan capability.
·         Rotating Turntable using Open-Source Ciclops scanner combined with webcam used for monitoring
·         Extendable universal spool holder with dehumidifer
·         Purge and Wipe brush built-in
a    Adjustable spool holder for varying spool sizes
Other Technical Specs:
·         16-tooth Pulley for Torque
·         1/16 Microstepping
·         Smoothieboard
o    Shake firmware
·         7" Galaxy Tab 4 for local control via SSH to Rpi 2
·         800 Watt 24V PSU
·         NEMA17 86-oz. in holding Torque
·         1.75 Filament
·         400mm diameter x 450mm? height
Posted by JL at 1:27 PM No comments: