Sunday, August 7, 2016
Moving Sites!
Hey guys, I've completely moved over to a new website! Keep updated and check out http://www.m8kx.wordpress.com
Tuesday, April 5, 2016
Magnetically Mounted Jamming Gripper for Auto Ejection Use
Since there has been a big push for Fusion 360, I thought i'd share my latest design utilizing it. It's a magnetically mounted jamming gripper derived from Cornell's positive displacement jamming gripper paper for print auto ejection use for the multi-tool changer delta printer
http://creativemachines.cornell.edu/positive_pressure_gripper
The Jamming gripper utilizes granular material, coffee beans in this case for its low density and cost. A soft membrane such as a rubber balloon is placed onto an object and a vacuum is created to constrict the coffee beans to grip the material of various shapes making it useful for 3D prints which vary greatly.
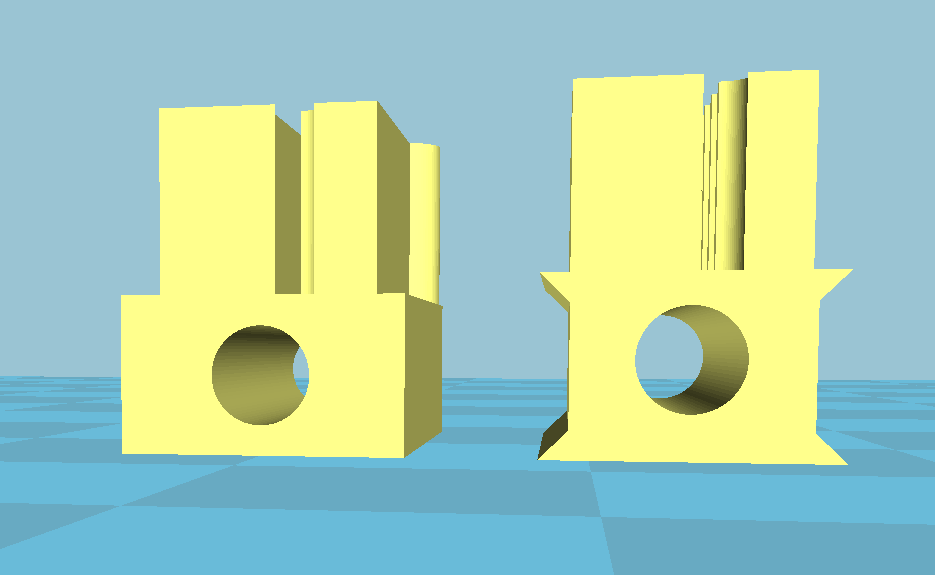
Three total pieces colored different for clarity:
Black Piece: Nd magnets in placed within each cylinder to mount underneath the delta printer's effector
Gray Piece: mounts to the top piece to contain the magnets as well as the inlet ports for the positive displacement and vacuum pump lines
White Piece: Seal for the rubber membrane gripper and mesh filter to filter the coffee beans from going into the inlet ports.

The next step is write a plugin to read the last few lines of the g-code prior to the end g-code, to use as the target point for the for jamming gripper to pick up the finished piece to a discrete location.
To be continued...

The next step is write a plugin to read the last few lines of the g-code prior to the end g-code, to use as the target point for the for jamming gripper to pick up the finished piece to a discrete location.
To be continued...
Sunday, March 6, 2016
3.6.16 Update
Overall Effector Update:


Here is an update to the Kinematic attachments to the effector. Previously, the white kinematic attachments were way too short which affected the stability, but increased the load capacity. As that was not necessary, a steeper angle is the better option as stability in the effector is far more important than load capacity for a bowden extruder design. The current iteration of the Maxwell Kinematic system with the split Vee design and Nd magnets has shown to be very repeatable.


Just an example of the Kraken sitting inside the effector. Ignore the wiring, it's not great at the moment...


This is the all new and improved Kossel Extender, It simply just wraps around the bottom vertices. It looks simple because it is. The old design (seen below) was designed too large and was in fact just getting too unwieldy to print. It was wasting practice, and had an unnecessary hole for wiring, but in fact, the entire thing just needed to be redesigned. So this iteration just has the main attachment and then the large spacers (100mm) for my printer are just added onto it. This also allows it to be more applicable to more printers as just the extenders have to be scaled without affecting the main attachment piece.

Sunday, February 28, 2016
2.27.16 MK-X Delta Kraken Effector Update
Effector Update

Here are 6 iterations of the kinematic effector mount left to right.
- The first iteration had very thin vee blocks with a thin outer ring containing the magnets.
- The second iteration had a thicker ring and a solid ceiling to prevent sagging from below.
- The third iteration was larger and a larger Vee groove to better mount the metal spheres
- The fourth iteration was subtle and slightly adjusted the Vee groove.
- The fifth iterations had a thicker mount for the M3 screw, as the thinner m3 mount would crack.
- The sixth iteration has two M3 screw mounts to better balance the mount when attached to the Kraken effector and has proven to be very successful.

The Kinematic Kraken mount using 3 steel spherical balls in which the Kraken hotend attaches to. This is iteration one.


Here is the fully attached kinematic kraken mount connected to the kraken effector. It has extremely high accuracy. This is based on kinematic coupling using a split vee mount developed by maxwell.

Wednesday, February 24, 2016
2.24.16 Delta Carriage Update
Another short update regarding the carriages:
The original design was switched from a trapezoid stabilizer to a rectangular one, but that still had too much twist on it. I've combined the two slightly and created the current iteration. You can see both the carriage and the belt tensioner below:

The additional edges increase the ability to reduce the twisting forces when tightening the belts.
That's all for now!
The original design was switched from a trapezoid stabilizer to a rectangular one, but that still had too much twist on it. I've combined the two slightly and created the current iteration. You can see both the carriage and the belt tensioner below:
The additional edges increase the ability to reduce the twisting forces when tightening the belts.
That's all for now!
Monday, February 22, 2016
2.22.16 MKX Carriage Update
Quick update on the delta carriage

Just a small update, I removed one of the mounting points as it is not used, only three are. Furthermore, I replaced the trapezoid style stabilizer in favor of a cubic stabilizer. However, there is still some twisting forces when tightening the belt tensioner and will probably be iterated on again.

Saturday, February 20, 2016
2.20.2016 Design update
Update on the MK-X Delta Printer
I've been working on the carriage design for V-Slot rails and the Delta Arm carriage that attaches to the rail carriage. It is still considered an alpha design and I am still in the midst of improving the design, but here are some photos and a bit of background on why I did what I did.First up: The Rail carriage:

The V-wheel carriage was subtly modified for M4 button screws and slight width adjustments to get a better fit for the V-slot wheels. This was modified from David Crocker's Thingiverse modification of Steve Graber's original design

This is the actual belt and rod carriage designed in OpenSCAD. This was the first printed iteration, but there were quite a few design iterations before reaching this one. However, The second I tested it, I realized there were quite a few improvements that could be made. It is a 4x screw mount when the carriage only requires 3, the belt gripper is slightly out of line with the idler pulley at the top of printer, and the belt tension screw mount needs to be adjusted.
The middle portion as a trapezoidal stabilizer that acts as a variable belt tensioner slow for the piece below to allow for screw adjustable tension. This will probably be modified to better suit the design and for overall efficiency.

This is the adjustable belt gripper section, it is similar to the belt gripper on the actual carriage except it runs on a trapezoid shape peg so that it reduces any twisting forces when the tension is being adjusted in the carriage via an m3 screw.
That is it for now. I hope to have some more updates soon.
Wednesday, February 3, 2016
MKX Delta Frame Quick Timelapse
We're back up and running!
I finally received both my steelcore gt2 belts and the Duet board. Now it's just about finishing the effect and carriage design, and we'll be ready to get moving.
Here's a quick timelapse of me putting together my delta frame with some dampening.
Subscribe to:
Comments (Atom)